
Candyland Party -1yr- A Game For Each Land
Idea#
24040
From
Lindy in Hackberry, Louisiana USA
Date
August 2012
Award
Runner Up
I decided to do a Candyland theme party for my daughters 1st birthday! The idea came about because I thought of making some gumdrops and lollipops for a photo shoot. Since I was going to put that much work into it, I thought it would be cute to use it for her party! I have to say thank you to the people on this site who submitted their parties. Theirs helped me when I needed an idea of how to do something or I needed inspiration.
INVITATIONS: I actually found some lollipop invitations at Hobby Lobby. They were brightly colored and were round so they looked like a lollipop and included very cute envelopes that were printed on the inside and out with candy and colored stripes. They also had a cellophane wrapper, lollipop stick and ribbon. I scanned the front of the invitation so I had that same lollipop swirl. I had a photographer take some one year pictures of her with some of the lollipops, banner and a wooden #1 cut-out I made. There were a few cute ones of her eating a very large lollipop. I took the image of my daughter with the lollipop in her hands and mouth and carefully erased the background with photoshop. Then I overlaid it on the right side of the lollipop image I scanned. The other side of the graphic, I wrote Run, run as fast as you can, we’re having a party in Candy Land. With lots of games, candy and fun, we’ll celebrate -Name- turning ONE! I printed them on photo paper, used a $7 circle cutter from walmart and glued that to the other side of the invitations I bought, inserted the stick, wrapped them in cellophane and tied with the ribbon. So on one side of the invitation it was the plain lollipop swirl and the other side was the graphic I made. I also have a store on zazzle and had a seller credit. I used this to order customized stamps with her picture and text that said Happy 1st Birthday, -Name-! I thought this would make a great keepsake because it had the price of postage on it. Normally they are close to $28 for 20 stamps, but since my store sold items, I paid less than $9 including shipping. I also found Candyland stickers at birthdayexpress.com (I will refer to this as BE for the rest of the party) and I used those to seal the envelopes.
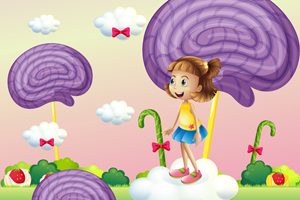
DECORATIONS: I made a lot of decorations for the party. For her cake table and present table I used a purple tablecloth and pink skirting on both. I ordered the medium Candyland banner from BE. Before I hung it up, I draped orange, blue, green and yellow tablecloths vertically by taping them on the wall. I then hung the banner over the top edges of the tablecloths. This made the backdrop looked striped. I pushed the cake table up against the wall and it held the bottoms in place. On her table I put a large glass cylinder container full of different licorice sticks, 2 small gumball machines, her cake, her smash cake, table topper with Candyland Characters from BE. I also bought some lollipop dessert plates and napkins from Hobby Lobby, they went on there as well. I made a gingerbread banner - I bought the crop-o-dile that was used in the tutorial, and I love it! I used this as a runner on the table. I put her present table next to the cake table. Behind it I had painted 2 large ice cream cones and a gumball machine on poster board and cut them out and taped to the wall. I also made a banner with her name on it and two gingerbread people. I printed it on card stock and bound it with lollipop brads so it was still jointed. On both sides of the table I had the Candyland balloons from BE and several colored balloons attached to two colorful balloon weights. We bought a cheap $20 helium tank from Dollar General.
The favor table was on the other end of the Community Center we rented. I used a red tablecloth and put a banner I bought from Hobby Lobby that matched the other stuff I got there. I took a photo every month in a different theme of my daughter. I always had a sign that said 1 month or 2 months etc. for each month that I painted over the same piece of ceiling tile and the same stuffed lamb to give the picture a sense of scale so that you could easily see how much she grew month to month. I printed the photos and glued them all on a piece of foam board, portrait orientation. I mounted that to a wooden circle using hot glue and dowel rods. *I mounted a lot of stuff that way* I took a wood screw and went under the bottom of the wooden circles (which I got for free from my brother’s job, they normally throw them away-they are lids to the container of a product they use), I taped the end of the dowel rods so they would not split with red duct tape, then I screwed them to the circle. Then I hot glued the foam board to the dowel rods.
So her 11 pictures (one for each month) was in the middle of the table. I also printed and framed 2 photos from her one year pictures we took and put those on both sides. I bought the party blow-outs and empty favor boxes from BE and put those on the table this was at the beginning of the Candyland rainbow trail. I also scattered unicorn pops on the table for the adult favors. I made a life-size game of Candyland with mini games! I used the large sheets of construction paper and put the colors in the same order as the game. I also printed out images of the special squares and attached those to the white squares of construction paper. I made a winding trail across the room and taped the squares together and to the floor. I had over 80 squares I think it was 4 packs.
Each Candyland area had its own decorations and mini game. I had a large sign in rainbow colors that said Name-‘s Candyland with an arrow and a square that said Start Here. As the kids came in, I instructed them to take an empty favor box and start through the trail. This worked out great since it didn’t get crowded at each area and it gave the kids something to do while they were waiting on everyone to get there. The first area they came up to was the gingerbread. Since the pawns in the real game are gingerbreads, I mounted on foam board a ginger bread boy and a gingerbread girl face-in-the-hole that I painted and cut out the faces. I made all the characters for the party by first using a projector and tracing the outlines, painted them, added 3-D elements like glitter, jewels, pompoms, etc, and then mounted them on the circles so they were easy to move around and stand up anywhere since we were inside. They turned out surprisingly durable. Also on each section I mounted on a circle and long dowel rod, and glued on a sign I printed on cardstock that described the area and a sign that gave instructions to the game. They came out really cute. I used a lot of color, some images and fun fonts. They were very bold.
On the gingerbread on it said Gingerbread’s Face-in-the-hole and Are you a gingerbread boy or girl? WHAT?! You’re not gingerbread? You must be gingerbread to play Candy Land! Put your face in the hole and take a picture. Say gingerbread! Each section also had a prize that doubled as favors. I found some cute gingerbread suckers on sale at Oriental Trading (referred to as OT since I will reference a lot) 12 for $1.99. So they picked that up and put it in their box.
The next area was Mr. Mint’s Peppermint forest. I painted a large Mr. Mint and mounted him to stand there. Here I made 6 round peppermint candies out of painted paper plates. I cut up on paper plate in the design I wanted and used that as a template so they would be consistent and faster to paint. I hot glued two plates together,I then covered them in cellophane and tied with a ribbon. Using the same dowel rod mounting technique, I made a limbo stick that went over the game board. I painted a large gift wrap tube white, used red duct tape to make the stripe, and then poked holes on each end where it would sit on the dowel rods forming a stationary limbo pole. I also used 3 more painted gift wrap tube peppermint sticks to form a sort of teepee or tripod over the candy cane prize suckers. This area said How low can you go? Limbo under the peppermint stick to win a candy cane! The next area was the Jolly’s Gumdrops. Here we had two games. The sign said How many gumdrops are in Jolly’s Jar?* Once you take your guess, find a candy underneath the giant gumdrops. Watch out for SPIDERS! I again painted and mounted a Jolly character.
I made 9 large gumdrops using the back end of a 2 liter bottle, a plastic bowl on top, newspaper wrapped around that, then I paper mached over it with brown craft paper (I used craft paper so it would be easier to paint), painted them bright, solid colors and sprayed them with several coats of glitter. This gave me a hollow gumdrop. I put fake spiders under 7 of them and cups full of fruit snacks under 2. I also filled up a sports water bottle with gummy bears, large gummy bears, gummy worms, and dots and everyone, including the adults, got to guess how many were in there. The winner a 3 year old - kept the bottle full of candy.
Next was Lord Licorice. I didn’t paint him because I didn’t want to!!! So instead I did this - The sign said Since he would steal all of the candy, Lord Licorice was not invited to the party. He agreed to stay home if everyone wore a mustache! I printed a sign that said pick your ‘stache with a mustache on it on red paper and wrapped it around a baby formula can. I ordered fake mustaches from OT and stuck them in there. The peanut area was next. I had Gramma Nut there. The sign said Pick ONE hole on the board, poke your hand through the colored hole and keep the prize! I took a foam poster board and measured and traced 20 holes with a plastic cup. I carefully cut each one out with an exacto knife. I had 5 rows of 4 circles. I covered the holes with tissue paper one color on each row. I hot glued it really tight so when the kids poked through it, it would be easy to get their hands through. I then took a small bag of peanuts, hand tattoo and silly bands from OT and put them into plastic cups. I then hot glued the cups to the back of the board. I glued a bunch of peanuts in their shell to the front of the board in a square pattern to outline each hole. I mounted this the same way as the other stuff, but I taped it down with duct tape so it wouldn’t move.
Next was Princess Lolly’s Bowling lanes. I made large lollipops that I painted in different patterns on paper plates, glued 2 plates together on dowel rods, covered them in cellophane, tied with ribbon and mounted on the circles. I also mounted some of the lollipop paper plates from Hobby Lobby like this that made small ones. I put 2 small ones and 2 large ones mounted together. I had 4 circles of each. I had a bowling game set up. The kids had to knock them down to win a large swirl lollipop I got from OT. I bought it from Party City.
Next was Queen Frostine. Lift the flaps on the top of Snowflake Lake. Find the snowflake and win an ice cream bowl and sprinkles! I used a round blue tablecloth folded over and printed pictures of funny water creatures octopus, crab, shrimp, nemo, a shoe, alligator etc. Under one I had a snowflake. The kids had to look under the flaps until they found the snowflake. I also had some glitter snowflakes we threw all over this area. Around the lake we put the prizes. I found some colorful ice cream bowls and matching spoons 2/$1.00 at the dollar tree! I also filled up a small container with sprinkles and stuck in the bowls. I was so excited and lucky to find these! Next was the chocolate swamp. I put a baby pool down for the game, and then laid over a round brown tablecloth. Party City had the brown tablecloths. I painted Gloppy, had fake Hershey kisses made out of foil covering the tops of 2 liter bottles with a paper flag hanging out, I covered some cardboard boxes with foil and paper to look like Hershey bars and bonbons. I also cut out and painted 3 fudgesickles and mounted them on dowel rods and circles. Inside the pool I put in small toys that I tied pipe cleaners to.
The kids had to use a toy fishing pole to hook one of the toys. I put in bubbles, yoyo’s wall climbers, airplanes and cars. I bought these from the favors section at walmart and from the Dollar Tree. The Candy castle was last. I painted King Candy and had Candyland Scratch offs I bought personalized from Ebay. These were really cute. It had -Name’s- first Birthday the winners had a candy under their scratcher. I had three Candyland games given out to the winners. Everyone received a treat bag with a toothbrush, ring pop and crazy straw. I was going to make a cardboard Candy Castle, but we just ended up using a bounce house with a slide. I am glad we went that way because the kids loved jumping. I also had various colored, helium filled balloons scattered throughout the game. I put gumballs in favor bags and used that to weigh down the balloons. We had chairs set up in front of her cake a present table and two tables with chairs to the side of that. I used green and yellow tablecloths there. In the center of each table I put some decorations I had left over from the game - a painted ice cream cone, a small lollipop, peppermint and a Hershey kiss on each table. I used napkins and plates from BE. I also bought some cheap plates in different colors just in case we ran out.
ACTIVITIES/GAMES: The games were at each section as mentioned earlier: Face-in-the-hole, limbo, gumdrop hunt, gumdrop guess, peanut poke, bowling, snowflake hunt, fishing game and the bounce house. The place we rented also had a play yard, but not many of the kids played out there. They made up their own game trying to slide the balloons with gumdrops across the floor!
COSTUMES: We really didn’t do any costumes. I just had my daughter wear a shirt made with the #1 and her name and a rainbow tutu, hair bow and barefoot sandals.
PARTY SNACKS: We had hot dogs, chips, drink barrels, Capri Sun, water and sodas. I thought about doing a chocolate fountain, but decided that it would probably be too much! Plus, I had a huge cake that I wanted people to eat!
CAKE: Another hobby of mine is cake decorating! For her large cake, I made a stacked 3 tier cake with my favorite white cake recipe. I iced it in homemade buttercream and wrapped it all in fondant. The bottom tier was white and I placed vertical strips of the rainbow colors in fondant, I left an equal amount of white in between each strip. The middle tier was pink and I wrapped a large green fondant bow around the bottom. I made 3-d elements out of fondant and placed around it. In the front and center was a gingerbread girl with bow, gumdrops and all sitting on top of the bow. I also made candy canes, ice cream cones with sprinkles and cherries, swirly lollipops on a stick and a gingerbread boy. The top tier was also white and I made her name in curly letters really large. As a topper I used a large swirl lollipop (the same as her pictures for her invitations) and stuck it on top. Then I put her #1 candle right in front of it. I piped a dot border on each tier. This was up on a cake stand. For her smash cake I have a really neat pan that bakes cakes to look like a mini 3 layered cake. I did that and iced it white. Then I went back and ribboned each layer purple, pink and yellow.
FAVORS: For the kids they each went home with a gingerbread sucker, candy cane, fruit snack, mustache, peanuts, hand tattoo, 2 silly bands, large swirl sucker, ice cream bowl and matching spoon, container of sprinkles, small toy, ring pop, tooth brush, silly straw and a balloon with gumballs. 3 children went home with a Candy Land game. One child left with 155 gummy candies. The adults took home a unicorn swirl pop and mustache if they wanted. I love that their little favor boxes were bursting over.
THANK YOU CARDS: I designed a thank you card using another image of her 1 year pictures with a lollipop saying Thank you for making my 1st birthday Sweet! I got these printed at vistaprint.com. I am going to print out all of the gingerbread face in the hole and mustache pictures and include them with the thank you cards! Finally, since I worked so hard to make all of the decorations, I did not want to throw them away. I do have to say everyone had a blast. People who weren’t even there have been talking about it. My niece told me You should do this every year! haha, that is not going to happen! It took me about 2 months to plan and make everything. If I did not work full time, it wouldn’t have taken me that long. I just did a little here and there. Overall the party was a success! With the exception of all of the favors I bought, the party really didn’t cost me that much money. The biggest cost next to that and the food was my order from BirthdayExpress and the stuff I bought from Hobby Lobby. The decorations I made were fairly cheap. I reused a lot of stuff I had, and I always have paint. The foam boards were about 1.50 each. The Dollar Tree has cheaper foam boards, but I do recommend getting the better quality ones from walmart for a little more money. They are sturdier, and the dollar tree ones tended to warp a little after I added all of the paint.
_______________________
About | Privacy Policy | Contact Us
.